Tuesday, December 29, 2009

Darkroom Premium - iPhone Camera App


I downloaded the app, Darkroom Premium for my iPhone.  It works great to get better pictures from the iPhone.

The app works just like the regular camera app that comes with the iPhone, but allows you to select four additional features: [Feature #3 is the best and really helps to get good pics in low light since it uses the iPhone accelerometers to know when the iPhone is being held fairly steady.]

Feature 1:   Delay the shutter by 3 sec, 10 sec, or 20 sec.  This is especially good for group photos when you want to be in the picture.

Feature 2:   Use the full screen of the iPhone as the shutter button.  This is good for taking pics of oneself when you cannot see the small area to touch to activate the camera to take the shot.   The granddaughters love to take their photos, and this feature makes it easy for them to do so.


Feature 3:  The shutter is delayed until the iPhone is being held reasonably steady ... three settings low, med, and high.  In the high setting, the camera has to be held VERY steady before the shutter automatically fires.

Feature 4:  Adds grid lines.  This allows  you to see when the iPhone is level in the picture.

Note:  Any combination of the four features work with each other.

I love my iPhone!

iPhone indispensable among travelers - Knockin' Video

Well, as usual it is always nice to travel with an iPhone.    With the new iPhone 3GS you can access internet, emails, apps when you have wifi in the motel or when visiting others along the road.  We had free wifi at the hotel we stayed in, but found the 3GS network even faster to use.   3GS and edge networks were useable, for most of the road trip.  Only a few spots along the trip were 'No Service'.

It is always nice to have the iphone and game apps to entertain the granddaughters, while waiting for dinner to be served at the restaurant and also handy for taking candid photo shots and video of those special moments.

I even used the 'Knockin' Video' app to share - video of the granddaughters swimming at the hotel pool and roller skating - with their Uncle, who wasn't able to join us due to illness in family.    I also sent a live video, as we were traveling on the road home.

The new GPS features on the 3GS iPhone, came in handy when we got lost in the fog one night, while returning to the hotel.

The roads along the way from Idaho to Oregon were almost all - snow free and the weather held out for us.  On the way back to Idaho, we did come across some patches  of snow on the road, and saw a car behind us spin out ... off the road.   We also saw one car upside down with emergency vehicles, ambulance and police .... along the roadside next to the Columbia gorge.   Going up the mountain outside Pendleton, Oregon, across the Blue Mountains, near Dead Man's Pass, the visibility was 500 feet for about 1.5 miles due to foggy conditions.  As we reached the top, I was able to snap this photo of the lingering clouds that we had driven through.


I love my iPhone!

Sunday, December 20, 2009

Sending iPhone Size Greeting Cards

I stumbled upon a cool site created by persons from Stanford University, Microsoft, Google and various Bay Area startups.  The site http://www.ecardlets.com  features user-generated ecards for the iPhone.  Users can add and send their own designs to iPhones.

I first tried using the ecardlets featured on the site and sent several using the options to email or send as SMS.  Both worked fine.   You can also send to Facebook and other sites.  Below is an example of the card I retrieved on my iPhone.  (note: the frames as I flicked the card open)


Then I decided it would be fun to bookmark the site on my iPhone and check out the interface to the site via my iPhone.  They have done an excellent job interfacing the ability to send a card from your iPhone.  The first screen allowed me to view the 'Categories' of cards available online to send.


I selected 'Get Well' and then proceeded to select a card.

Once the card was selected, a screen that allowed me to enter the recipient's email or phone number, senders name, senders email and message.    The card could be sent on its way via email or SMS to the recipient, by clicking the sent button.


These 3 dimensional ecards take advantage of the iPhone user interface, allowing the recepient to open and close the card with their fingers.  Quite a clever application and can see that it may become a popular site for us iPhone addicts.

Information for creating your own custom card designs is available as well at http://www.ecardlets.com/personal/ 

Putting Captions on iPhone Photos

I love the application 'Skitch' that I use on my Mac.  I have found an app called 'Photo Notes' which allows me to place text or speech bubbles or just text on a photo that I take from my albums stored on the iPhone or onto a photo I take via camera. 

You can change the size of the bubble, position the bubble or text on the photo, as well as change the background color behind the text and the text fonts.  The interface for changing attributes is through small icons that can be accessed by merely tapping the selected photo.

The full version which can be purchased on Apple iTunes store, can save the Photo Note, send it by email or put it straight on to Facebook all from within "Photo Notes - Make Your Photo".

Using the free version, you can use the press 'sleep' and 'home' buttons simultaneously to take a screenshot of your finished photo with text to your iPhone camera album.  From there you can email it to a friend.


It might not have all the features that I love in Skitch, but it is a cute way to send a quick  photo with caption to a friend or grandchild.

Tuesday, December 15, 2009

Doplr - File Sharing Made Easy

Today I downloaded an app called 'Doplr' designed by TinyCrumb and Culturezoo.  The application runs as an menubar icon application that resides in the upper right hand menubar of your Mac.

The application allows users to drag and drop files to this icon, where the items are stored in a  1 GB online storage space available to each user for free.  Once these items are uploaded, a URL is provided that can be shared with anyone.   It is easy to use, fast, and seems to work seamlessly.

It provides a means to easily share items with others.   It also has easy integration with Twitter.

Suggest checking out this new app available at http://droplr.com/hello

Wednesday, December 09, 2009

How to Automatically Add Lyrics to iTunes for iPhone & iPod Viewing

The iPhone and some of the iPods are capable of displaying lyrics to songs playing. First you must have the lyrics stored in iTunes library.
You can google the lyrics for a song in your browser and then select that song in iTunes music library. Pressing cmd I (for getting info on the song) will bring up various tabs about that song, one of which is ‘Lyrics’. You can copy the lyrics from the webpage and then paste into the lyrics tab for the song.


Another method, is to try the shareware application ‘Get Lyrical’(http://shullian.com/get_lyrical.php), but consider donating if you intend to use this software. Once you have downloaded the application to your hard drive, You can select a track or tracks, turn on ‘Active Tagging’ to get lyrics for songs as you play them. If a songs lyrics are found and added, the small circle will turn green.

You can also browse and edit the lyrics right from a text editor within Get Lyrical.

Some types of files such as WAV and QuickTime files don't support lyrics, though you can convert to WAV and QuickTime files into a format that would allow you to add lyrics such as AAC or MP3.

Once you have the lyrics for the songs, then sync to your iPod or iPhone. On iPods, start playing the song to which you added lyrics. Press the Center button repeatedly. The number of times depends on if you have artwork or not. Here is the order of the things that are displayed when you press the Center button:

Play status > Scrubber > Album Art > Lyrics/Description > Rating

If you don't have Album Art or Lyrics, then you'll just see the Rating
Play status > Scrubber > Rating

To view the lyrics on an iPhone, just click on the album for the song.

Monday, December 07, 2009

Cooking Class at Hotel California - Baja - Todos Santos

I spent the Thanksgiving holiday in Mexico with some of my family members.  We had a great time snorkeling with sea pups, surfing on Cerritos Beach near Todos Santos on the Baja penisula, and taking in a great cooking class at the Hotel California with Chef Dany.

Before the cooking class we were treated to a great visit to Punta Lobos, the sweeping Pacific beach where the local fishermen of Todos Santos launch their boats each morning and bring in the daily catch each afternoon.  We were able to see the various catch of the day as well as marvel at the young juvenile pelicans that waited for their daily handouts.  It is amazing to see the boats come in from their day at sea, plowing up on the beach at full throttle.


We were also given a tour of  a local organic farm in the small town of El Pescadero, where many of the herbs and greens we used for our cooking class were grown.   The guide also provided a nice history of this area of Mexico and the Baja penisula. 

Before the cooking class we also helped the bartender make a jamaica margarita which had a mild syrup of jamaica juice (somewhat like cranberry), and another syrup of jalepeno.  The combination was mild and not too spicy, but with just a kick and difference to make it a wonderful starter.

The cooking class took place in the restaurant's kitchen with hands on preparation by the four members of our group.  Each member was given a recipe and special instruction by the Chef or kitchen staff in preparing his or her recipe.  The meal consisted of 5 courses:  an ahi tuna appetizer, organic green salad with special crostini, shrimp on rosemary skewers, flank steak marinated in sauce and served with a special salsa made with a molcajete (a mortar and pestle lava stone tool), and a banana pineapple flambe over ice cream.    The ingredients in each of the dishes added a touch of spice giving them a Mexican flair.    The chef joined us for a marvelous meal.  We learned so much about the cooking and experienced a little part of the culture as well.  It was a great experience and highly recommend taking a class when visiting Todos Santos. 

Friday, November 20, 2009

Reducing PDF file

A few days ago, I needed to upload a pdf file to a Yahoo group forum which was over 5MB in size.  I wasn't able to upload due to the size of the pdf file.  So I split the file into two parts, posting each one separately on the site.

I received a kind email from forum member who had used Adobe Pro to reduce the size of the original file from 5 MB to 2.5MB.  I had not realized that this was offered as a feature in the Adobe software.  I have Adobe Standard Edition for the Mac and decided to try this clever tip.  It worked ... in the 'File' menu was the 'Reduce File Size' option.   I was then able to repost the pdf file in one part to the forum.

Tuesday, November 17, 2009

Sending yourself a direct message using Twitter

You can send yourself a direct message using Twitter.  Type the letter, d and then space and then your username and the message.  (d  + username  + message).  You can send direct message from your iPhone or computer or 3rd party apps.

Example:
   d Granny_Joan This is a direct message to myself.


If your message is longer than 140 characters and Twitter receives it intact,  your message will be sent in two parts.  But, beware: if your service provider breaks up long messages into two parts before sending the message to Twitter, Twitter will only see the d+username attached to the first message!  The second part will post to the public time line as a regular update because it doesn't have the d+username preceding it. 


People who have their direct message text and email notifications set to ON will receive direct messages on their phones and/or via email.  Tweets sent using any of the methods described above are not public: only author and recipient can view direct messages.
 

Using the direct message to yourself, you can post the URL for me.com privately to yourself and access that URL from your direct messages to help locate your iPhone using the method described in previous blog post.

Monday, November 16, 2009

Accessing MobileMe from iPhone

I was surfing the internet today and noticed a tweet referring to accessing MobileMe account via iPhone.  Normally if one tries to do so, via Safari browser, this doesn't work.

Someone suggested using a link from a twitter app on your iPhone.  So I tried it on two twitter applications:  Tweetdeck and Tweetero and it worked with both apps.

First log onto your twitter account using an iPhone app and send yourself a tweet with the link to mobileme.com URL.  (http://me.com/)


Click on the link in the twitter app.


If your twitter app has a built in web browser, it should attempt to connect with the mobileme URL.  Normally a warning page would appear, stating it best to use Safari or Firefox browser.  Ignore this warning and click on 'Continue' button.


The MobileMe Login window should then appear and you should enter your username and password for your MobileMe account and click on 'Login' button.


Next you will be logged into your MobileMe account and able to access mail, calendar, etc.


You may find this a bit slower than using the apps already built into the iPhone, but the real key here is being able to use the 'FindMe' service via your friend's iPhone when you lose it out and about.  You will be able to log into your MobileMe account to use the 'FindMe' service without having to be on a computer.

Thursday, November 12, 2009

Holiday Mailouts - Using Address Book to Print Labels

As Thanksgiving approaches, I am reminded of my cousin who methodically addresses Christmas cards and sends them out during this holiday.  Every year without fail, I receive a card from my dear cousin first.  I was thinking today, that for some of us, the printing of labels is a major task.   So I decided to blog about the ability of the Address Book application on the Macintosh.  Did you know that hidden within the print feature of Address Book is the ability to print labels?

If you have most of your contacts, family and friends in your address book, you can use the 'group' feature to put them into a 'Holiday List'.  Once this has been done, which is fairly easy to accomplish by merely, selecting 'New Group' from the 'File' menubar options and giving it a name say, 'Holiday List'.   Then select 'All Contacts' and drag and drop each that you wish to include in this Holiday List into the group icon in the left hand column.


Once you have all your contacts listed within the 'Holiday List' group, then select this group and then using the 'Print' option from the 'File' menubar or the command P key shortcut, to bring up the print dialog box.  The print dialog box may default to a window similar to the one below:

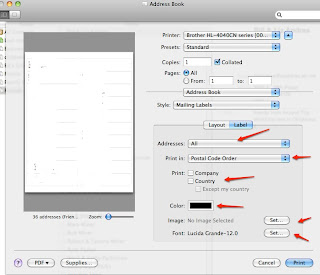
To the right of your printer name, you will see a down arrow, click on this arrow to bring up more options, similar to below and click on the pop-down 'address book' and select 'printer settings'.  Then click on  'media type' options to select 'label'.


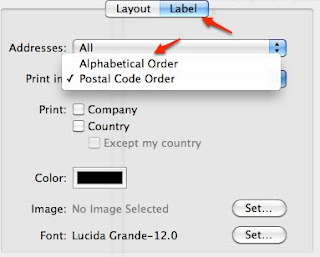
As you explore the many options, you will see pop-down menus that allow you to select the order of printing the labels (postal code or alphabetical),  whether to print home/work/or other address, whether to include an image, set a color or font. 


Then click on the 'Layout' tab and choose a label type from the 'Page' pop down menu.   To set the page margins and gutter space between labels, and how many labels to print on a page, choose 'Define Custom'.
 

You can then preview the page of addresses using the 'pdf' pop down option to view in preview first.

As the holidays approach I am wondering will I get the cards and well wishes out on time or will I be sending out Valentine wishes instead?  Let me be the first to wish everyone a very Happy Holiday season and Happy New Year!

Note:   Whitepages.com offers a new holiday list manager and label printer. If you wish to search for an address or cross-check current listings from whitepages.com online, this would be a great way to fill in the missing addresses and contact information.  If you have not built a contact list in address book, using whitepages to find the info and create a list and print the list is another great solution!


Wednesday, November 11, 2009

Editing Background for Twitter

Occasionally I like to change the background on my Twitter page.  I decided today to change the photo to a picture we took in Southern Idaho during Fall 2003 of the lovely display of 'fall colors' along the side of the road.


It is best to use a jpeg file format of less than 800K in size.  You may also use Gif or Png formats as well.  Select 'Settings' from your profile or home page. 


Next select, 'Design' from the menu options that appear along the Settings tab bar.


Select 'Change Background Image' below the standard themes. 


Then select from the window the option to 'Choose file',  select the jpg file that you wish to use from the selection window.  Make sure you also click on the 'Save' button.


A message sttating that your custom design has been saved should appear at the top of the browser window.   The photo should appear as a background.   I had a small amount of trouble having my selected photo appear and am not sure what the actual problem was.  I suspected the Twitter server was bogged down at the time I was loading in the photo.

I had tried using Firefox Browser and then decided to use Safari.  The problem persisted and I was not able to see the photo as a background.  I decided to try one last thing.  I went from my Twitter home page to the settings, selected design again and this time clicked on the blue background square and save changes button without reloading the photo and it appeared.  Not sure which or if anything I did caused the photo to appear as a background or if Twitter servers became agreeable to display the image with the passage of time. 
 

Tuesday, November 03, 2009

How to Convert Docs to Read with Stanza on iPhone

Often I store documents on Google Docs that I share with family and friends.  These documents are often itineraries, maps, brochures or info on trips and countries that I visit.  Google Docs is a great place to share info with others, even allowing them to edit a shared document such as a spreadsheet, but these documents are often only available via wifi connection and can be expensive to access using 3GS/Edge or WIFI from my iPhone while traveling in foreign countries.

Today I was reading a forum post that suggested a program  Calibre eBook and conversion App for iPhone.   Calibre is  free, open source and cross-platform in design and works well on Linux, OS X and Windows  e-library solution.  It features library management, format conversion, news feeds to ebook conversion, as well as e-book reader sync features and an integrated e-book viewer.

Basically, one can take a pdf file and convert it to a epub format that Stanza (an ebook reader app ) can access on an iPhone.   I selected a pdf file of maps of Cabo that I downloaded from my Google Docs to my hard drive.   I ran the Calibre application from my Macintosh, and selected 'Add Books' from the upper left hand icon bar.   I then selected the pdf file from the selection popup window.

The pdf file then appeared listed in the lower window of Calibre.  I then selected the uploaded document and then selected 'Convert E-Book'.  I then saved it to disk in the userlibrary on my harddrive.


I then selected the 'Preferences' under the Calibre menubar.  From the left handside I selected 'Content Server' and then from the right handside of window, I selected 'Start Server'.   I also ran Stanza app on my iPhone and selected 'Share Books'.   Under the 'Shared Books', I saw the label for my books located on my Macintosh.   Selecting this revealed the options of selecting the books located in the folder on my Mac by either title, author, newest, tag or series. 

I selected the newly converted document and then opted to download to my iPhone.   This will allow me to have books stored on my iPhone to read during trips without having access to WIFI or Edge/3GS networks.

Monday, November 02, 2009

Back from Tahiti - Tips for Traveling with iPhone

I just returned from a two week cruise around French Polynesia. Basically it looks like paradise, colorful people, lovely scenery, and the bluest water in the world. In fact, it is probably one of the most beautiful places to visit, however, it is very HOT and HUMID. I found that it was amazing that I could sweat while walking in the rain. I would also say that it has some amazing snorkeling and diving opportunities around the lesser populated atolls. I even saw a shark!


I had the foresight to download some excellent podcasts to listen to in the cabin of the cruise ship (which does not have TV). My husband and I enjoyed listening to these podcasts from the iPhone and it was very much like having talk radio available to us.  One of the great things about traveling with an iPhone is that you can preload 'podcasts' from your favorite RSS subscriptions or online bloggers.

Originally I was a little frightened by the acronym 'RSS' ... imagining a great technological knowledge was needed to subscribe to a podcast. But, it sounds complicated and tricky, but actually pretty seamless to use if you are capturing the podcast in iTunes. Apple has made that category in iTunes fairly easy to setup. Normally, one would click on a subscription link or RSS feed link for audio podcast using a browser and these podcasts would appear within the podcast category of iTunes. ITunes also keeps track of the different podcasts that you subscribe to, in an organized manner with episodes, time, release date, description and artist ...  ITunes also uses an indicator (circle) to designate whether you have listened to a podcast in entirety or partially.

There are many interesting podcasts on the internet and also via the Apple iTunes store. Some popular ones might talk about technology, travel, or even be a course on learning languages. I find that downloading language podcasts to iTunes to use while traveling to foreign countries an excellent way to learn a few phrases for my trips.

Once the podcasts are located in iTunes, you can hook up your iPhone and use the 'Podcasts' tab to select podcasts to store on your iPhone. You can also selectively choose the number of episodes from a podcast or select only ones you wish to download to the iPhone. If you download these prior to arriving in a foreign country, you will have access to them from your iPhone while in 'Airplane Mode'. You will not need to download while on the trip and have WIFI connection.


 One other tip, when you are in another part of the world, it is easy to use the clock on the iPhone to set the correct 'world time zone' (general setting ... date and time option).   We found the ability to not only listen to music, play game apps and take video/photos with the camera, but also use the alarm clock app, a great asset ... all in one small and useful device.


Thursday, October 15, 2009

Exploring the Wonderful World of PC 1985

This summer I took on the project of saving some of the old VHS, 8 mm film clips and mini dv tapes to my Mac.  I will be doing a few blogs on this procedure in November.  My main goal was to backup all those old tapes the kids made in junior high, before the tapes disintegrated.  

I came across a video on VHS  made in 1985 depicting a typical computer session in our home.  We were testing out the new VHS video recorder and I was trying to setup a new PC.  I had been an Apple user from day one, having such machines as a Lisa, Apple II, Apple II+, a Franklin (Apple clone), and Apple III.   The first programs, that I wrote and developed, were designed to run on Apple computers.   As my programs became popular, I was asked to port the software to the 'World of PC's'.    I thought I would post this old video, as an example of some old VHS footage that I was able to salvage.

Before I start explaining how I converted the numerous old VHS type tapes to my Mac, I thought I would explain how I was able to post this video into this blog.

Since the blogger site allows HTML embed code, this seemed the easiest way to embed the video to this site. So I went to my youtube site and brought up the video that I wished to place on this blog as an example.

To the left of the video, below the youtube account name and description of the video is the URL for this video, as well as the embed code for the particular video.  I also noticed a 'gear type icon' to the right of the embed code.  Clicking on this 'gear icon', options for adding a border, color theme and size to the player for this video was given. 

 I then copied the ‘embed code’ and pasted it into the blog HTML code editor for my blogger site.

Monday, October 12, 2009

Flash or Not to Flash

There is a free app for the iPhone called 'Camera Flash Free' that I just downloaded to my phone.   It offers the options to take photos that are adjusted by a magical algorithm to provide light or flash to the end result.   The app also allows you to select a previously taken photo and to apply lighting to that photo as well.

I have taken a photo of a shiny coffee caref using the built in iPhone camera and also with the Camera Flash Free app.  Here are the results:


Secondly, I took the first photo above, the one taken with the built in camera app for the iPhone, and applied the lighting using the Camera Flash free app to an existing photo in my Camera Roll.  The results are below:


What do you think about this free flash app?  Does it help the photo?  Well, one thing is for sure, like you learn on ebay when taking photos of shiny objects, beware of the refection that appears on the object, you may expose yourself.